As photographers, Are we hung up on gear and the best of the best sharpness!

Having been a photographer for over 20+ years I’ve had the pleasure to use a mix of lenses, bodies, brands.

I’ve seen people pixel peeping and making sure that their images are so sharp, that you could almost cut yourself!

Brands are bringing out bigger, brighter, and better bodies almost monthly in a bid to be ‘brand of the year’ and with those brands comes megapixel perfection! 24mp, 40mp and some even 100mp plus.

Lenses have become increasingly clearer, with better and better glass including Zeiss, Sony G master, Sigma Art, Canon Rf, there are so many it’s hard to name them all and to keep up!

With that, comes the cost! The price of quality comes at a premium. And sometimes that’s where those starting out differ from those who are well established and possibly have a bank balance to burn.

Media shows us that the best images/video make the cut! To stand out you need to have 4/8k video or 100mp images with perfect colours, the right depth of field and beautiful bokeh!

But do we need this ! The tools help us create higher quality content but depending on what you’re doing with the output image it’s not the best all and end all!

I’m not done here but, Whats your opinion? Leave a comment

The last few weeks I’ve been sharing images to a number of media outlets! Including and not limited to printed products, social platforms, websites and even local news papers.

All of which have been images taken using all different brands/quality of body and or lens variations. I’ve had amazing feedback on the images with people sharing them, comments left, right and centre, and over the last 4 months seen images picked for publication without any question of … what camera brand, lens, pixel amount those images were taken with.

This has lead me to question whether we need the best of the best and do we need to buy the latest version of our chosen brands, because something new has been added to the latest version.

So last week I set myself a challenge! Get published with low quality gear!

Now I shoot with two brands Sony and Nikon, I have two cameras of each brand! Not going to be specific with models. Or details. But I set myself some basic rules that the lens choice had to stick to;

  • Priced under £100.
  • Had to be second hand.
  • Needed to be multi use. (Landscape / macro / zoom etc)
  • Had to fit kit I owned.
  • Didn’t need to be brand specific. (Like Nikon for Nikon or Sony for Sony)

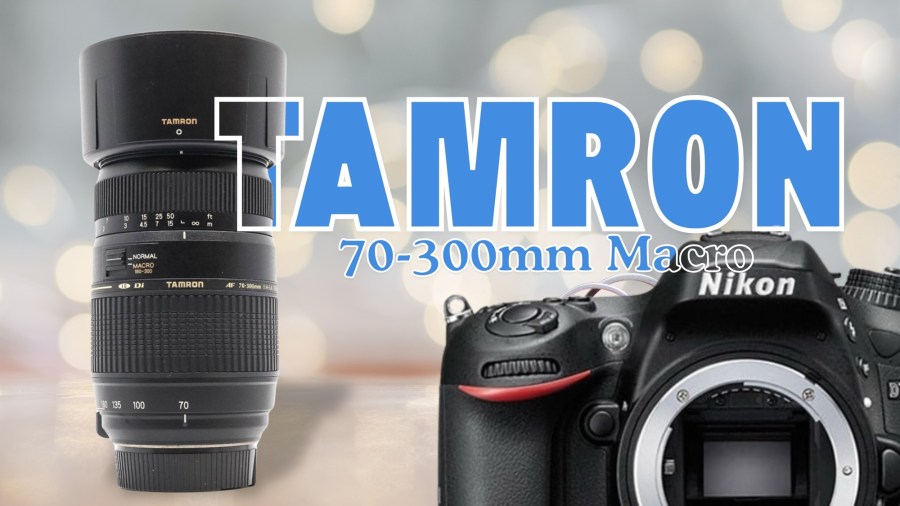
So I popped to the local camera shops with the mind set of getting a telephoto lens, that possibly has macro brand of Sigma or Tamron.

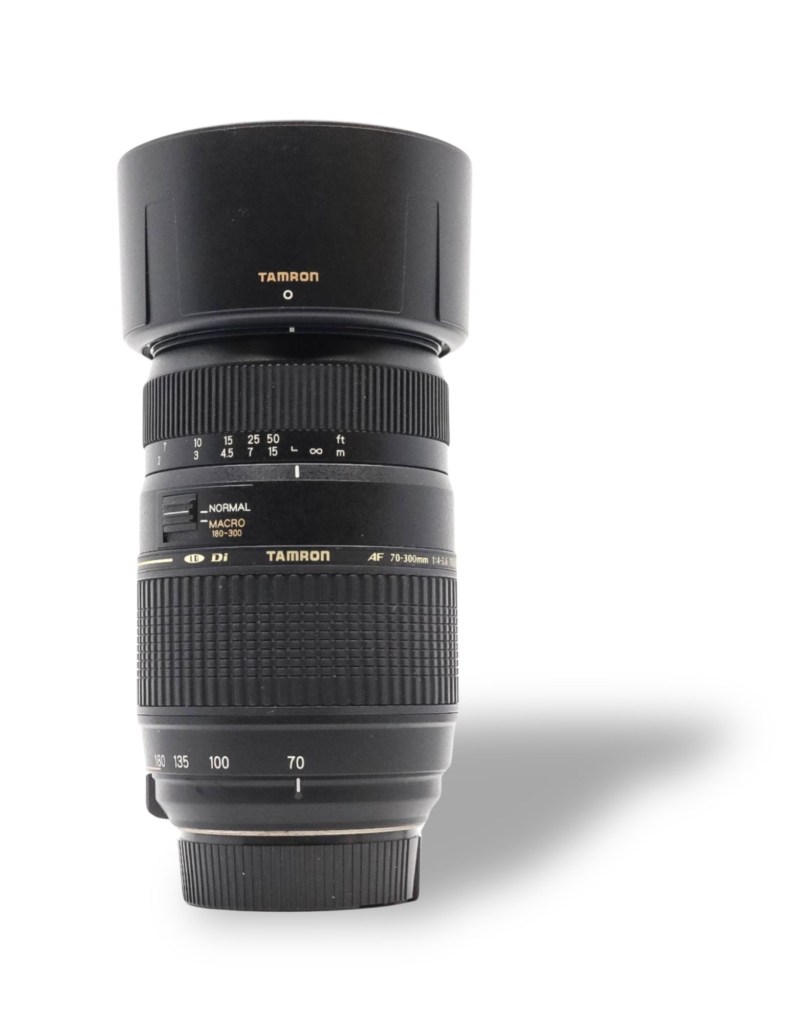
It didn’t take long to find the candidate! the Tamron 70-300 macro lens,

For starters, it seems like it has a lot going for it. It’s both telephoto and macro and looking in the window of the local Camera World. It’s under £100 by £5 and walking past Cex I see it for even less £85 well it’s looking more and more appealing. But times run away and blooming shop was shut! So guess it’s not meant to be!

But now I have an idea of what I’m looking for– Time to head home!

With the shops shut what will any tech guy do ! Yes head to the big World Wide Web! And the trusty MPB. For those that don’t know about MPB. They are a fantastic online company buying and selling all things photography. I’ve used them many times for lenses and bodies, so it will always be my next stop if local shops don’t have what I’m wanting.

If you want to save money, stick around for a link to saving £20 on any new purchase. At MPB.com

Back to searching! So a few clicks later and it’s on screen, there was three available for sale second hand and it didn’t come as a shock but the price was OVER half the cost of camera world and CEX

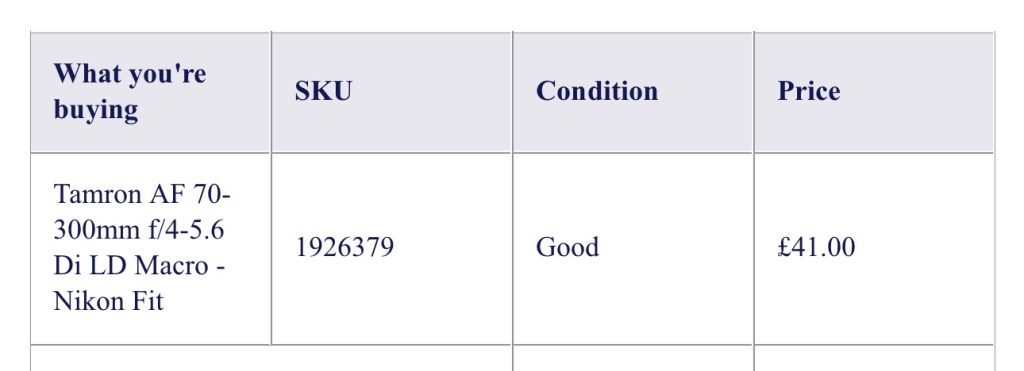
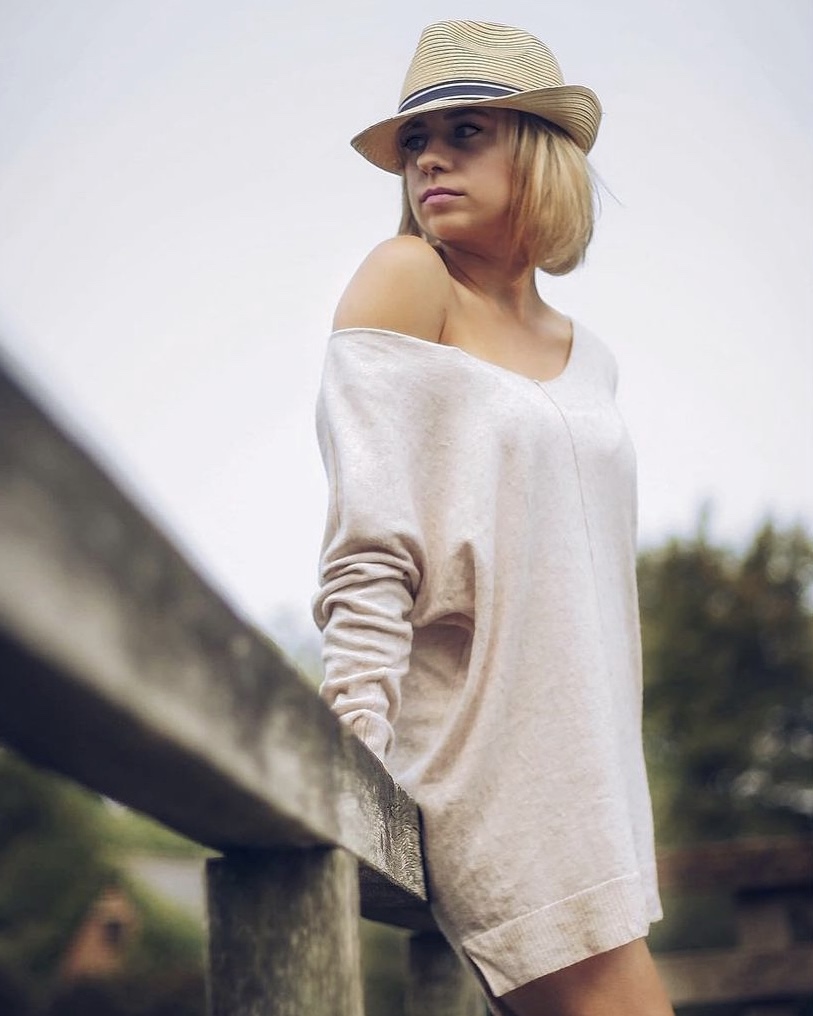
I didn’t waste time! Clicked the buy button and sorted out the details and just two days later there it was on the door step! Now ! You can see that this one is classed as GOOD condition.. and for the sum of £41 can’t really ask for much more ! Personally I think the rating was a little low! Opening the box of this very well wrapped up product soon showed me it was great condition! And like always ! I couldn’t wait to try it ! So with my trusted model I snapped the first shots …

Model Marlie ! Low window light ..

Setting F7.1 – 1/1600s – iso 400 @ 202mm

Okay first off this lens isn’t fantastic ! But again what more could you ask for from a lens that’s not brand new, that’s been out years, possibly been used a lot. Though the look of the lens seems like it’s been in a bag and not used for a while.. but on testing showed its self to be pretty sharp, focused after a couple of clicks and focus motor wasn’t too loud either !

TOUCH WOOD ! ALL GOOD! So far

Now to get some pictures and see if I can get published 🙂

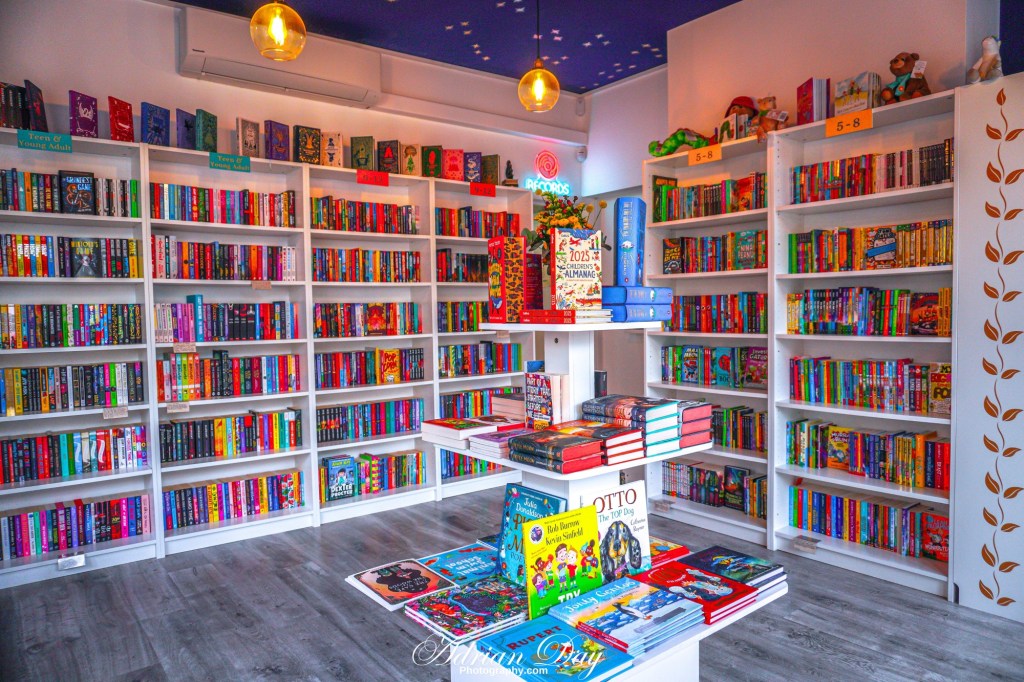
The next day came and I thought I would head to town to get some local shop / location pictures

These are the pictures I captured.

Again these images are not perfect, but pretty clear and the best I could get at 70mm. Now to post them to the pages that could potentially take my images and make publications out of 1 or more!

A week later looks what happened! Here is one of the images in the local news paper.

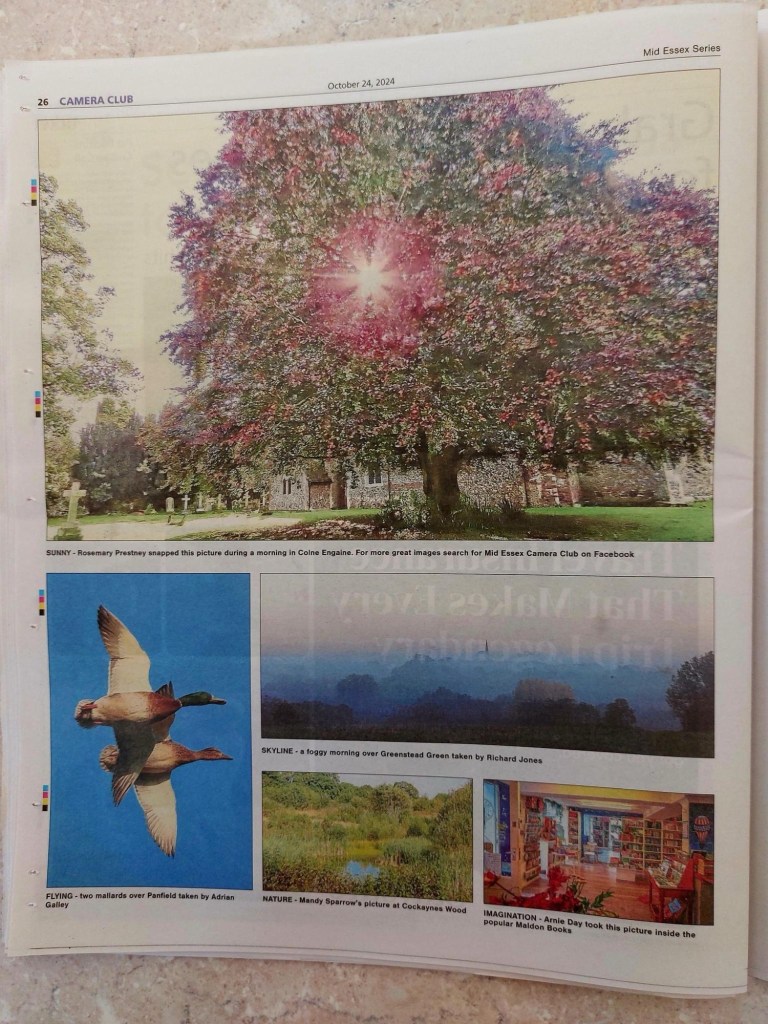
It’s not perfect but it’s still a publication.. and I still haven’t really used the lens to its full potential. Yet..

This shows that any quality of lens and camera body has the potential. You don’t need the all singing all dancing gear ..

Don’t get me wrong having the best gear will make things a little easier or even have a better quality overall but this shows it’s not all about spending £1000’s on gear … you can do it on a budget if need be …

Maybe it’s all in the eye of the photographer and his editing skills 😉

Watch this space for more on this lens and using low quality lenses to get published and paid work !

Get £20 off for your first purchase at MPB. By clicking the link below! This is a promotion and I believe a limited time offer! If asked use code Adrian Day at checkout.

https://mention-me.com/m/ol/or9bk-adrian-day

Should we be worried that the aurora is being seen as far as the United Kingdom.

So yet again this year we have all been looking sky wards as the aurora borealis make its way over the horizon.

I for one was out there with the camera as soon as I got the notification of activity… (thanks to Aurora Watch UK app)

We are very lucky to be seeing something that originally wasn’t viewable in the United Kingdom. And was something we would have to travel miles to catch a glimpse of. And even then it wasn’t a predictable experience..

Yet sightings of the Aurora are starting to become a natural occurrence here! And many of those being seen by the naked eye and not just by long exposure cameras.

The question I’ve seen people asking is, is this a bad thing?

What does this really mean? Are we getting these sightings more frequently because of the ozone layer! Or changes in geomagnetic conditions , are these phenomena mixed in with climate change and the way the world has been going crazy with high winds like those in America this week with winds that have hit 150 plus miles per hour!

What do you think? so much more to learn! About these things! We all take for granted!

Here are a few images from the first major sighting of the Aurora in the uk at the start of 2024. BEAUTIFUL & CAPTIVATING!

Though the world thinks these are beautiful! Who else thinks there is more to this !

I’m not clued up enough to pass a judgment on what’s going on ! I’m just a photographer ! And that’s all!

Let’s all hope that there isn’t more to this !

Portrait photographer turned Landscape photographer

The photography community got hit pretty hard when the uk was his with the coronavirus.

When people couldn’t come together, it made being a photographer pretty void. We couldn’t do wedding, birthday parties, family or single person portraits and couldn’t keep doing our main income of corporate headshots.

So a number of amazing photographers had to diversify into other forms of photography. To keep their business afloat.

Me being one!

It’s not a hard transition if I’m completely honest! As long as you know your gear and understand the basics of composition then a lot of it falls into place pretty fast.

I think I was very lucky to have a good array of different lenses, That would suit both portrait and landscape photography. As I own zoom and prime lenses with every focal length from 10mm to 900mm so i feel I was in a good place to take the plunge with landscape photography.

So I headed out on what was to be a fun journey of landscape exploration and documentation.

Along the way it’s taken some side steps not only have I found amazing places to photograph but also beautiful seascapes, shipwrecks even cityscapes.

Karma shipwreck
Local Churches
The City of London
Autumn vista Delph Ditch Maldon

In the last two years I’ve seen and captured some amazing images. From sunsets to blue moons, old barges and rundown buildings that are part of our history but will never be re built. But tell stories of years gone by.

I’ve seen my images in local news papers, in magazines, printed on show stands at photography shows for companies like fujifilm. Even been part of a gallery exhibition.

All these things I couldn’t have dreamt of being a part of without becoming a landscape photographer.

Over the next few months I will adding new images and sharing more of what I’m doing on here so I hope to get your support and feedback

So Two years on and I now have a passion for landscape and where it can take me. And now I’m branching out. So that many more people can be part of my journey. I’m opening a small online store so that people can purchase my images as digital downloads and also printed photography products. At a low price.

And at the same time support me on my journey if you wish to know more /make a purchase click the button below it will take you there

Ko-fi Shop
Buy with confidence securely 24/7

What you can expect to find over the coming weeks

  • High resolution image downloads
  • Calendars (current year 2024)
  • Christmas cards
  • Birthday cards
  • Wall art
  • Keyrings
  • All this & More will be added over coming weeks.
  • You can also support us by donation on the same app. This is done with either purchasing a product and adding more to the price or simply using the donation button and donating what you can afford.

Please if you have gotten this far please click follow to see updates as we will be posting new product listings as we add them to our shop. And also you can see some of our new amazing images first.

Understanding ISO in photography – one part of the exposure triangle.

Photography is an art form that has evolved over time with the advancement of technology. One of the essential aspects of photography is ISO, which determines the sensitivity of the camera’s sensor to light. ISO stands for International Organization for Standardization, which sets the standard for sensitivity ratings in photography.

In this short post we will discuss what ISO is and how it works and categorize it into three categories: basic, in-depth, and advanced understanding.

Firstly three images .. starting from 100 in picture one 3200 in picture 2 and 6400 in picture three. to see the way images have less detail and also more noise the higher the ISO

Image 1 shot at ISO 100 – Nikon 7200
Image 2 shot at ISO 3200 – Nikon 7200
Image 3 shot at ISO 6400 Nikon 7200

Basic understanding of ISO:

ISO is a measure of the camera’s sensitivity to light. The lower the ISO number, the less sensitive the camera is to light, and the higher the number, the more sensitive it is. In simple terms, ISO determines how bright or dark an image will appear. For instance, a low ISO number of 100 will produce a darker image, while a higher ISO number of 800 will produce a brighter image.

In-depth understanding of ISO:

ISO is one of the three essential elements of exposure, along with aperture and shutter speed. Aperture refers to the size of the opening in the lens that allows light to enter, while shutter speed is the duration of time the shutter remains open. ISO plays a vital role in exposure because it allows the photographer to adjust the camera’s sensitivity to light to achieve the desired exposure.

A low ISO setting is ideal for shooting in bright conditions, such as outdoors on a sunny day. On the other hand, a high ISO setting is suitable for shooting in low light conditions, such as indoors or at night. However, a high ISO setting can introduce digital noise or graininess to an image, which can result in a loss of detail and clarity. It’s essential to strike a balance between the ISO setting, aperture, and shutter speed to achieve the best exposure and image quality.

Advanced understanding of ISO:

In addition to its role in exposure, ISO can also affect the overall mood and style of an image. A low ISO setting can produce a sharper and cleaner image with less noise, while a high ISO setting can create a grainy or gritty look, which can be desirable in certain types of photography, such as street or documentary photography.

Another advanced technique is ISO bracketing, which involves taking multiple shots of the same scene with different ISO settings. This technique is useful for capturing images in unpredictable lighting conditions, such as during a sunset or sunrise, where the light changes quickly. By taking multiple shots at different ISO settings, the photographer can choose the best exposure and eliminate any unwanted noise or graininess.

In conclusion, ISO is an essential aspect of photography that determines the camera’s sensitivity to light. It plays a vital role in exposure, image quality, and overall style and mood of an image. Understanding the basic, in-depth, and advanced aspects of ISO can help photographers make informed decisions when setting up their camera and capturing their vision.

This is part of basic learning with photography. There are more technical details to iso but I don’t want these posts to resemble a ikea instruction manual lol! And more make it a simple understandable read.

Low light photography! A few simple things to know and understand when working in low light conditions.

Low light photography can be a challenging but rewarding experience. It requires a combination of technical knowledge and creative thinking to capture beautiful and unique images in dimly lit environments. In this essay, we will explore some tips and techniques for getting the best results from your camera in low light situations, and how to avoid common pitfalls that lead to blurry

images.

The first step in low light photography is to understand the limitations of your camera. Most cameras perform best in bright light, and as the light level decreases, the camera’s ability to capture sharp and detailed images also decreases. This is because the camera’s sensor needs a certain amount of light to function properly, and in low light situations, the sensor may not be able to gather enough light to produce a clear image.

To compensate for this, you will need to use a longer shutter speed, which allows more light to reach the sensor. However, using a longer shutter speed also increases the risk of camera shake, which can result in blurry images. To avoid this, you will need to use a tripod or some other form of support to keep your camera steady. Additionally, you can use the self-timer function on your camera to avoid camera shake caused by pressing the shutter button.

Another way to increase the amount of light reaching the sensor is to use a wider aperture. Aperture is the opening in the lens that controls how much light reaches the sensor. By using a wider aperture, more light can enter the camera and reach the sensor. However, this also affects the depth of field, which is the area of the image that is in focus. A wider aperture will result in a shallower depth of field, which can be useful for creating a sense of depth and separation in your images.

Another important aspect of low light photography is ISO. ISO is a measure of the camera’s sensitivity to light. The lower the ISO, the less sensitive the camera is to light and the less noise in the image. However, in low light situations, you may need to use a higher ISO to get a well-exposed image. But, as you increase the ISO, you will also increase the amount of noise in the image, which can be unsightly. So, it’s a balance between having a well-exposed image and having noise in the image.

In addition to adjusting these technical settings, you can also use creative techniques to enhance your low light images. For example, you can use a flashlight or other light source to illuminate specific areas of the image. You can also use long exposures to capture the movement of light in the scene. This can create interesting and dynamic images that are not possible in bright light.

In conclusion, low light photography can be a challenging but rewarding experience. It requires a combination of technical knowledge and creative thinking to capture beautiful and unique images in dimly lit environments. By understanding the limitations of your camera, using a tripod or other form of support, adjusting the aperture, ISO and shutter speed, and using creative techniques, you can get the best results from your camera in low light situations and avoid the common pitfalls that lead to blurry images.

My ten tips to create beautiful lighting that flatters for that perfect selfie or as a professional photographer.

This is My Ten simple tips to create beautiful lighting that flatters for professional photos or perfect selfies

1: Use natural light whenever possible.
Natural light is often the most flattering and easiest to work with. Putting your subject in the right place at the right time of day with natural light can be the softest lighting to work with, and most effective.

All natural overcast day light

2: Experiment with different times of day.
The quality of light can change significantly depending on the time of day, so try shooting at different times to see what works best for you or your subject.

3: Use reflectors or a white card to bounce light back onto the subject.
This can help fill in shadows and add dimension to the subject. Bring out a glow to the eyes and under the chin to make an image more appealing to the eye.

4: Experiment with different light sources.
In addition to natural light, you can also use artificial light sources such as studio strobes or continuous lights. Even a simple ring light can be a creative tool or a small video light will add a pop to your pictures.

5: Pay attention to the direction of the light.
Light that is coming from the side or from behind the subject can create a more dramatic effect, sometimes a bright light from behind will result in a more silhouetted looking image.

Natural light with a reflector to reduce shadows and add a catch light to the eyes

6: Use diffusers to soften the light.
This can help reduce harsh shadows and make the light more flattering to the subject. A simple white sheet over a window will give a soft touch to any image.

7: Avoid shooting directly into the sun.
This can create harsh shadows and cause lens flare and in turn make the images soft with less contrast. Though this rule isn’t always bad. It can also be creative if used in the correct environment .

Bright side light from back lighting in mid day sun

8: Use negative fill to create shadows. By placing a dark object near the subject, you can create shadows and add depth to the image.
If you have a very light room from natural light through a window or a white bedroom this idea will be great, even a dark sheet/ blind or black card will reduce some light giving more depth to a subject.

9: Experiment with different apertures. Aperture controls the amount of light that enters the camera, as well as the depth of field.
This can be found on all manual settings in camera or on smartphones. This is perfect to add a little creative look when using a low F number ..

10: Keep an eye on the colour temperature of the light. Different light sources can cast different color temperatures, which can affect the overall mood of the image. Use a colour checker or white balance tools to help ensure accurate colour. For instance house lighting and sunlight can produce a warm tone to an image.. where a window lit by indirect light or even a snow scene will have a cooler more white look..

Please remember that these are my personal tips, we all have our own ideas. There’s nothing wrong with using a bunch of the above methods and then in your preferred editing software creating something much more refined or dramatic.

Let me know what you try and how it works out for you.

Follow me on here or on Instagram http://www.instagram.com/adriandayphotography to see more !

The 85mm lens every photographer should own one!

This is the Sony 85mm f1.8 FE lens..

This is my Five reasons I love my 85mm lens it’s one of my bread and butter lenses.

1: It’s great for Portrait photography:

The 85mm focal length is ideal for portrait photography because it allows you to capture flattering, up-close shots of your subject without distorting their features. This is especially useful for capturing headshots and full-body portraits.

Portrait with the 85mm Sony lens


2: Bokeh:

The 85mm lens is known for its ability to produce beautiful, creamy bokeh in the background of your photos. This is especially useful for isolating your subject and drawing attention to them.

Bokeh balls

3: Low light performance:

Many 85mm lenses have a wide maximum aperture, which allows them to perform well in low light situations. This makes them a great choice for indoor photography or for shooting at dusk or dawn.

Wide open aperture and small fits in your hand form factor.

4: Compact size:

85mm lenses are generally smaller and more lightweight than other lenses, making them a convenient choice for photographers on the go.

5: Versatility:

While the 85mm lens is often used for portraits, it can also be used for a variety of other subjects, including landscape, street, and event photography. It’s a versatile lens that can be used in many different situations. The 85mm is always with me!

In closing:

So, in all honesty this lens is one lens I would recommend any photographer purchasing.

These days the 85mm 1.8 isn’t that expensive and if you’re a multi shooting photographer who likes shooting landscapes events or models, this lens would pay for its self ! Low cost, high quality prime lens that will get plenty of use!

To finish … if you’re a photographer or someone just starting out. And own an 85mm lens let me know in the comments if you agree that it’s worthwhile buying one..

Free Arrow video assets yes these overlays are free completely free.

Hey guys I’m giving these simple arrow assets / overlays away these are simple and all you need to do is download these and add them as a picture then use chroma to clear the green around the edge.

Resize them to suit your video add a little transition and you will have a fantastic yet simple overlay ..

Watch the reel that goes with these overlays

Heading out on a cold and crispy morning for a spot of nature and landscape photography

Saturday November 20/2021 6:00am can’t sleep! Been trying, but I just can’t seem to sleep. Clocks ticking, cats got a sugar rush on! Mind away with the fairies! Other half’s got the fidgets

I look at the better half and suggest the unexpected!!! No hey …. Stop thinking that.. nothing rude!! Shall we get sorted and head out with the cameras ? Not expecting the “sure let’s do it!” Reply .. wicked, that buzz kicks in!!

And Like a kid a Christmas, I spring from the bed before the ‘or should we just stay in bed kicks in’ a quick shower later … Coffee in hand camera bag on our backs, we head to the door.. yes obviously we got dressed too!

Now as the door opens that rush of cold air hits your face and you think am I really doing this .. but anyone who loves being a photographer will tell you .. we want to get back in bed ! No … not that at all!

We will do anything to get a great shot!

Now the destination we have planned to go is pretty local, about a thirty minute walk. a little more when it’s chilly and you haven’t had any sleep in 48 hours !

It’s a lovely part of a sea side town in Maldon Essex.. called ‘The Maldon Promenade’. It’s known for its boats, amazing sunrises, distant river views, shipwrecks and it’s many birds ! And a favourite place for me to frequent

A short stroll later, we enter the gates and cross the vast green fields to the sea wall.. sadly the tide is coming in, but it’s still a way out .. so first thoughts ‘I may not get the shots I would really like’.

As you can see tide still way out but will be in, in a few hours ! Fingers telling me “hey we’re already cold!’’

But the smell that’s in the air is refreshing .. no again I bet you’re predicting the next line to be, the smell of the sea.. no actually it’s the smell of bacon. This location has food huts ! And they open early ! Bri & Debs best in the park! For food and drinks !

But that will have to wait we need to get some work done, then it’s time for hot food!

Okay back to the photography!

Our first port of call was to walk toward the shipwreck (karma) thats finding its resting place just off the river blackwater but close to the edge of the back main field of the promenade, this ship can be seen looking down from the bird watching tower or you can take a very slippery walk along the sea wall, me being a daredevil I took the slippery route!

It’s not hard to find the entrance to this part of the sea wall, as there is a loop that you can do of the promenade and if you take the gravel track walk you’ll soon find there is a little trail that bares left that takes you along the main sea wall towards Maryland sea .. a very long walk.. One I started at the beginning of Autumn. ‘Started but didn’t finish’

If you walk just a few steps into this trail you will see a walk way that takes you perfectly yet slip sliding towards the shipwreck.. (yes I did it Saturday) btw if you’re thinking of walking and trying this route.. don’t do it while the tides coming in unless you have your wit’s about you.. as water comes in round the back of you.

About fifteen feet round this ridge is the shipwreck and yes it’s the perfect photogenic subject ..

sadly the sun come up just before we got to our shipwreck destination .. but we didn’t miss anything as the sky was so cloudy and overcast there was no beautiful sunrise to be had.. to give this shipwreck the perfect pop, one I’ve captured so many time before.. but still I managed to get this shot below ..

KARMA SHIPWRECK .. As the sky was just greyish blue i tried to take the image showing minimal sky ..

The light was just starting to get change as I took this so this pointed us in the direction of the birds .. and soft light, I could tell this was going to be fun! This could take a little walking and me being quiet.. not something I’m said to be good at..

We started back toward the back field and a small area known as Delph Ditch. It’s a grassy and wooded area With small bird, moorhens, coots and the odd duck or two.

This is about the 100th time we have been here so we knew there was going to be a couple of things that could take our fancy.. there is a beautiful tree that stands tall above a small wooden bridge. We have aptly named the water lilies. You know like the monet painting.. take a look at the image below and even though it’s Autumn the only difference to me is the colours ! With the Autumn oranges and warm tones.

Delph Ditch an interpretation of Monet’s – water lilies

Here is where we crossed from the left of the image through and under the tree and crossed over ‘The trolls style bridge’ to the right hand side ..

As you cross this bridge you can look behind the tree and see what’s in the little stream that runs off about 40 ft into the distance.. there wasn’t much apart from a small Robin and he soon made a fly for it. So we started our climb back ..

This is where we met a little friend!

We had only walked about fifteen feet from the bridge when my partner told me to stop! And stay still.. and look slowly down to the right on the fence.. I didn’t see it at first but there stood a a stunning fluffed up Robin.. it soon become apparent that she wasn’t alone. ( no I don’t mean because we was there 😄 )

There was a family of robins and they was super friendly .. bobbing from the fence a few feet over to the shrubs and then back to the fence.. each time it come to land on the fence it got closer and closer to us and the camera that was resting on the top of the fence post.

Now I’ve been close to a few birds in my time… yes the feathered kind.. but never been close to a Robin. The longer we stayed the closer she was getting. Every time she landed, I would try to snap some shots off .. then refocus when she landed on the shrubs . Back and forth.. until she was that close just an inch from the tip of my lens … I think she was showing off to us and so was mr Robin he wouldn’t get as close but still within a couple of feet.

I think you can tell with the images that I’ve managed to capture how close these beautiful bird got to the camera .. very happy with this set of images .. images below 👇

Images 1 Robin looking for her Batmanshe was so close I wish I had took some food with me.. or come here after going to the food kiosk.. maybe it would have eaten out of my hand.

Image 2 as she was just a few inches from me on the top of the fence .. could see so much detail in her feathers !

Image 3 And the there he was Mr Robin I believe.. watching from just a few feet away.. such a beautiful sight to see and honestly loved getting these images .

Now time was getting away, we had been here for about 3 hours and Mr piggy was calling ! No not a pig I could take photos of. More the bacon roll I hit upon earlier.. so off we trotted to the kiosk and got a hot chocolate and a bacon roll to take away.. this is where things to yet another odd turn of events .

Just call be bird man!

To get to Bri n Debs kiosk from where we was capturing the Robin it’s about a five minute walk along the sea wall back towards the main lake .. again time may very depending on energy level .. mine at this time well over 48 hours with out sleep.. it took a little while longer ! But while taking this slow stroll, We come across a sign that tell you what birds to expect to see walking around the Promenade!

While my partner walked over and ordered our mid morning bacon roll I stood reading the sign!

And seeing if I could see many of the birds on the list, Now just so you know I’m literally standing twelve inches from the sign. And nearly get landed on by two starlings .. trying to land on said sign.. right infront of me. First thought ‘the birds here are blooming friendly ! ‘

Tap on shoulder and the good lady has returned from the kiosk with breakfast! I managed to take my first bite look up and to my surprise there was five starlings now! Looking at me with the ‘I’m hungry give that bun to me look’

Honestly it was like a mini scene from the film ‘The birds’

If I moved left they did if I moved right they did.

Ping! Brain fart.. let’s see if they want some of this roll and maybe I can get a few images along the way .. not so surprising.. took a pea size nibble off the roll and the birds starting tweeting! Loudly ! Not sure if this was a give me tweet or not didn’t take long to find out it was more of a phone call to their friends and family.. because bird started landing from everywhere.

About 30 in total ! At one point or another I put my hand out and the bird furthest left on the sign takes of and nips it right out my fingers ! And fly’s away, I look down take another small piece off look up and the space that had the last bird I fed was taken, put hand out again the first in line took off pinched with piece of roll and took off !

By Now the line was pretty full ! about 10 bird on the sign and there was an audience of starlings on the sea wall.. and people watching me feeding out of hand these stunning birds … now to cut a long story short ! I’m not great with an audience! ‘Human audience that is’

So I take out the camera and real off a number of shots trying to capture a number of them as they all had something different about them from speckled chests to colourful bellies.. fat one skinny one!

The feeding wasn’t over ! Ended up feeding the masses with half my roll ! And having a field day with these beautiful starlings.

landing on my hand, flitting back and forth changing places. I managed to take a good thirty images maybe even more and my partner took a lot too.. these guys, honestly such beautiful birds.. people truly misjudge them and the way the work as a team their wasn’t any fighting stealing it was like a natural feeding line .. one after the other.

Here are a few of this shots so you can see what I mean !! Take a moment to look at the details on their body and the stunning ‘petrol on water’ colours in the blacks !

Standing in line ! The middle one is ready to fly because I had food in my left hand 🙂

Feeding line this way Im so sure that this one was not cleaning its self more directing air traffic control!

I’ve been tangoed such vibrant orange tones and Cadbury purple tints to the wings

The boss man the colours on this one just outstanding .. peacocking in all it’s glory.. really beautiful!

Sadly this was all the time we had as we needed to get back home, but we spent a good five hours at this location.. and we will definitely be returning here.. so keep those eyes open for more birds boats and landscape..

Please if you managed to read this to this point thank you for taking the time out of your day I know times precious! Thank you for your support. And will we are talking about support please follow the blog .. so you can be first to see posts

We have great posts coming on here.. if you can head over to our social pages and show some love that would be amazing .. links are in our menu..

And most of all please feel free to comment ! I love interacting with you all ! And love hearing what you all think!

So until next time ! Remember you only have one life, one shot, so capture it!

Thanks again!

Head over to http://www.Instagram.com/adriandayphotography to see the latest post from me

Facebook and instagrams down perfect time to rebuild the New website … it’s now up and running – read on –

Oh dear social media went pop tonight but what did everyone do??

Me I did something that’s been on hold for some time.. and after the silly thing of clicking the wrong button! Yes we all do that once or twice in our life 😉

I decided it was time to get to grips and change the websites design. So tonight while the world was going mad and at a loose end .. I took the chance and started rebuilding !

I managed to get so much done with out distraction of social media pinging away !

I got 20 pages built and so many external likes done .. still a lot to do but I’m honestly loving the new look and feel of this page! And mixed in with the blog I can’t be more happy..

If you have read this far ! And still with me click the link below head over and check out the new pages and let me know what you think ! It’s still a work in progress but I’m loving the change!

Please come back and let me know what you think!

Adrian Day Photography

What would you like to learn about photography?

Been a while since I’ve posted a full blog post!

Now you all know I’m first and foremost a photographer .. a portrait and boudoir photographer predominately.. but over the last year I’ve been taking time out to gain skills in landscape and nature photography..

Also having won a number of competition with my landscape work I feel I’m doing pretty well! Like having my work shown at the fujifilm print life stand at the Birmingham photography show.

Fujifilm print life stand !

Now I know I’ve been doing short posts and running this is because I’ve been doing so many things I’ve not had time to do deep messages and long posts!

Well I’ve just started to add to that! Even more!

With a new section to my website and my Adrian Day YouTube channel this is going to be where I post tips, tricks and reviews of photography products and ideas to help all you guys and girls become better photographers and to enjoy the craft and the creative side of the industry.

But before I start posting videos and blog posts about this I would love to hear from others as to what you would like to see! .. I know what I look for but that’s me ! I don’t just want to post what I want to know .. I want to post at the needs of others !

See this could be anything for creative tips like using a prism or coloured lighting. Or it could be what I suggest to be the best lens for portraits or landscapes

It could be that you want to know about editing and how I edit my images using Adobe Lightroom or photoshop.. and what you want to learn specifically like colour toning or black and white conversion

Maybe you only have your phone to take pictures and that’s a perfectly great option as they say “the best camera is the one you have with you!” and want to know the best apps I use to edit the questions are endless!

But please feel free to comment below with your questions and I will write them all down and create future posts to answer your questions !

Also coming soon to help users of lightroom I’m going to start putting together downloadable products Things like brushes for photoshop and presets and Lut’s for both Lightroom and photoshop

These will be priced at silly prices ! So anyone can obtain them on the smallest of budgets to help them grow and learn faster! I currently have over 50 presets from colour to black and white! Ready to go! Just sorting out the website over the next few weeks to make them downloadable for you all!

There is so much more to come ! So if you have read this far please hit the follow button so that you can be notified when I post.. and as I say please leave a comment below if you find this page helpful and have a question you want answering!

Once again thank you everyone for your support and sticking with me over covid months ! It’s much appreciated!

BTW WHEN LEAVING A COMMENT .. YOU DONT NEED TO ADD EMAIL ADDRESS OR OTHER DETAILS BUT PLEASE LEAVE A NAME SO I CAN RELATE THE POST BACK TO YOUR QUESTION.. .. BUT PLEASE LEAVE A COMMENT BE GREAT TO CONNECT TO YOU ALL!