
new video up on my youtube channel please help me out and go share soem ove then let me know below
Category: Adrian Day
NEW TIPS AND TRICKS VIDEO LIVE ON MY SHORTS FEED AND ON TIKTOK
Please if you’re not already following these pages please do would love to have you along for the journey
take a look at the youtube channel im just starting to grow it but today i will be posting my 75th shorts video for my tips and tricks series and im really trying to grow both my youtube and my tiktok accounts so if you have either I would love to have you along for the ride follow the video below to tap all those right buttons like follow subscribe and maybe if you get something from these videos a like or comment. it really does help

Photographers join me on my 365 tips and tricks series. On YouTube tip 1#
Follow me on my channel by following the link below to the first video in my series !
Would love your input !
Want your photos to have the same look as your favourite film colour grading! in Lightroom cc & mobile
Use this prompt to get the best settings
Either copy and paste this prompt into chatGPT
Making the changes you need for your camera and your film you’re looking to replicate.. and then follow the output settings to create a preset ..
PROMPT TO USE:
Give me the complete Lightroom Classic or Lightroom Mobile settings needed to colour grade my “CAMERA BRAND” RAW image file so it closely resembles “FILM NAME”.
Use Lightroom settings only. Do not use LUTs, presets, Photoshop, plug-ins or external software.
Assume the image is correctly exposed before grading.
Please provide detailed values for:
- Profile recommendation
- White Balance (Temperature & Tint)
- Exposure adjustments (only if generally required)
- Contrast
- Highlights
- Shadows
- Whites
- Blacks
- Texture
- Clarity
- Dehaze
- Vibrance
- Saturation
Then provide:
Tone Curve
- RGB Curve
- Red Curve
- Green Curve
- Blue Curve
HSL / Colour Mixer
For every colour:
- Red
- Orange
- Yellow
- Green
- Aqua
- Blue
- Purple
- Magenta
Include:
- Hue
- Saturation
- Luminance
Colour Grading Panel
Include precise values for:
- Shadows
- Midtones
- Highlights
- Blending
- Balance
Calibration Panel
Include:
- Red Primary (Hue & Saturation)
- Green Primary (Hue & Saturation)
- Blue Primary (Hue & Saturation)
Detail Panel
Recommend:
- Sharpening
- Radius
- Detail
- Masking
- Noise Reduction
- Colour Noise Reduction
Effects
Include:
- Grain Amount
- Grain Size
- Grain Roughness
- Post-Crop Vignette (if appropriate)
Finally, explain:
- Why each adjustment helps recreate the look of “FILM NAME”.
- Which colours define the film’s signature look.
- Which lighting conditions this film emulation works best in.
- Which subjects suit this colour grade best (portrait, street, landscape, documentary, etc.).
- Any limitations of recreating this film stock using Lightroom alone.
If you don’t have time to copy and paste this prompt into chat GPT RIGHT NOW
Then download this file below.

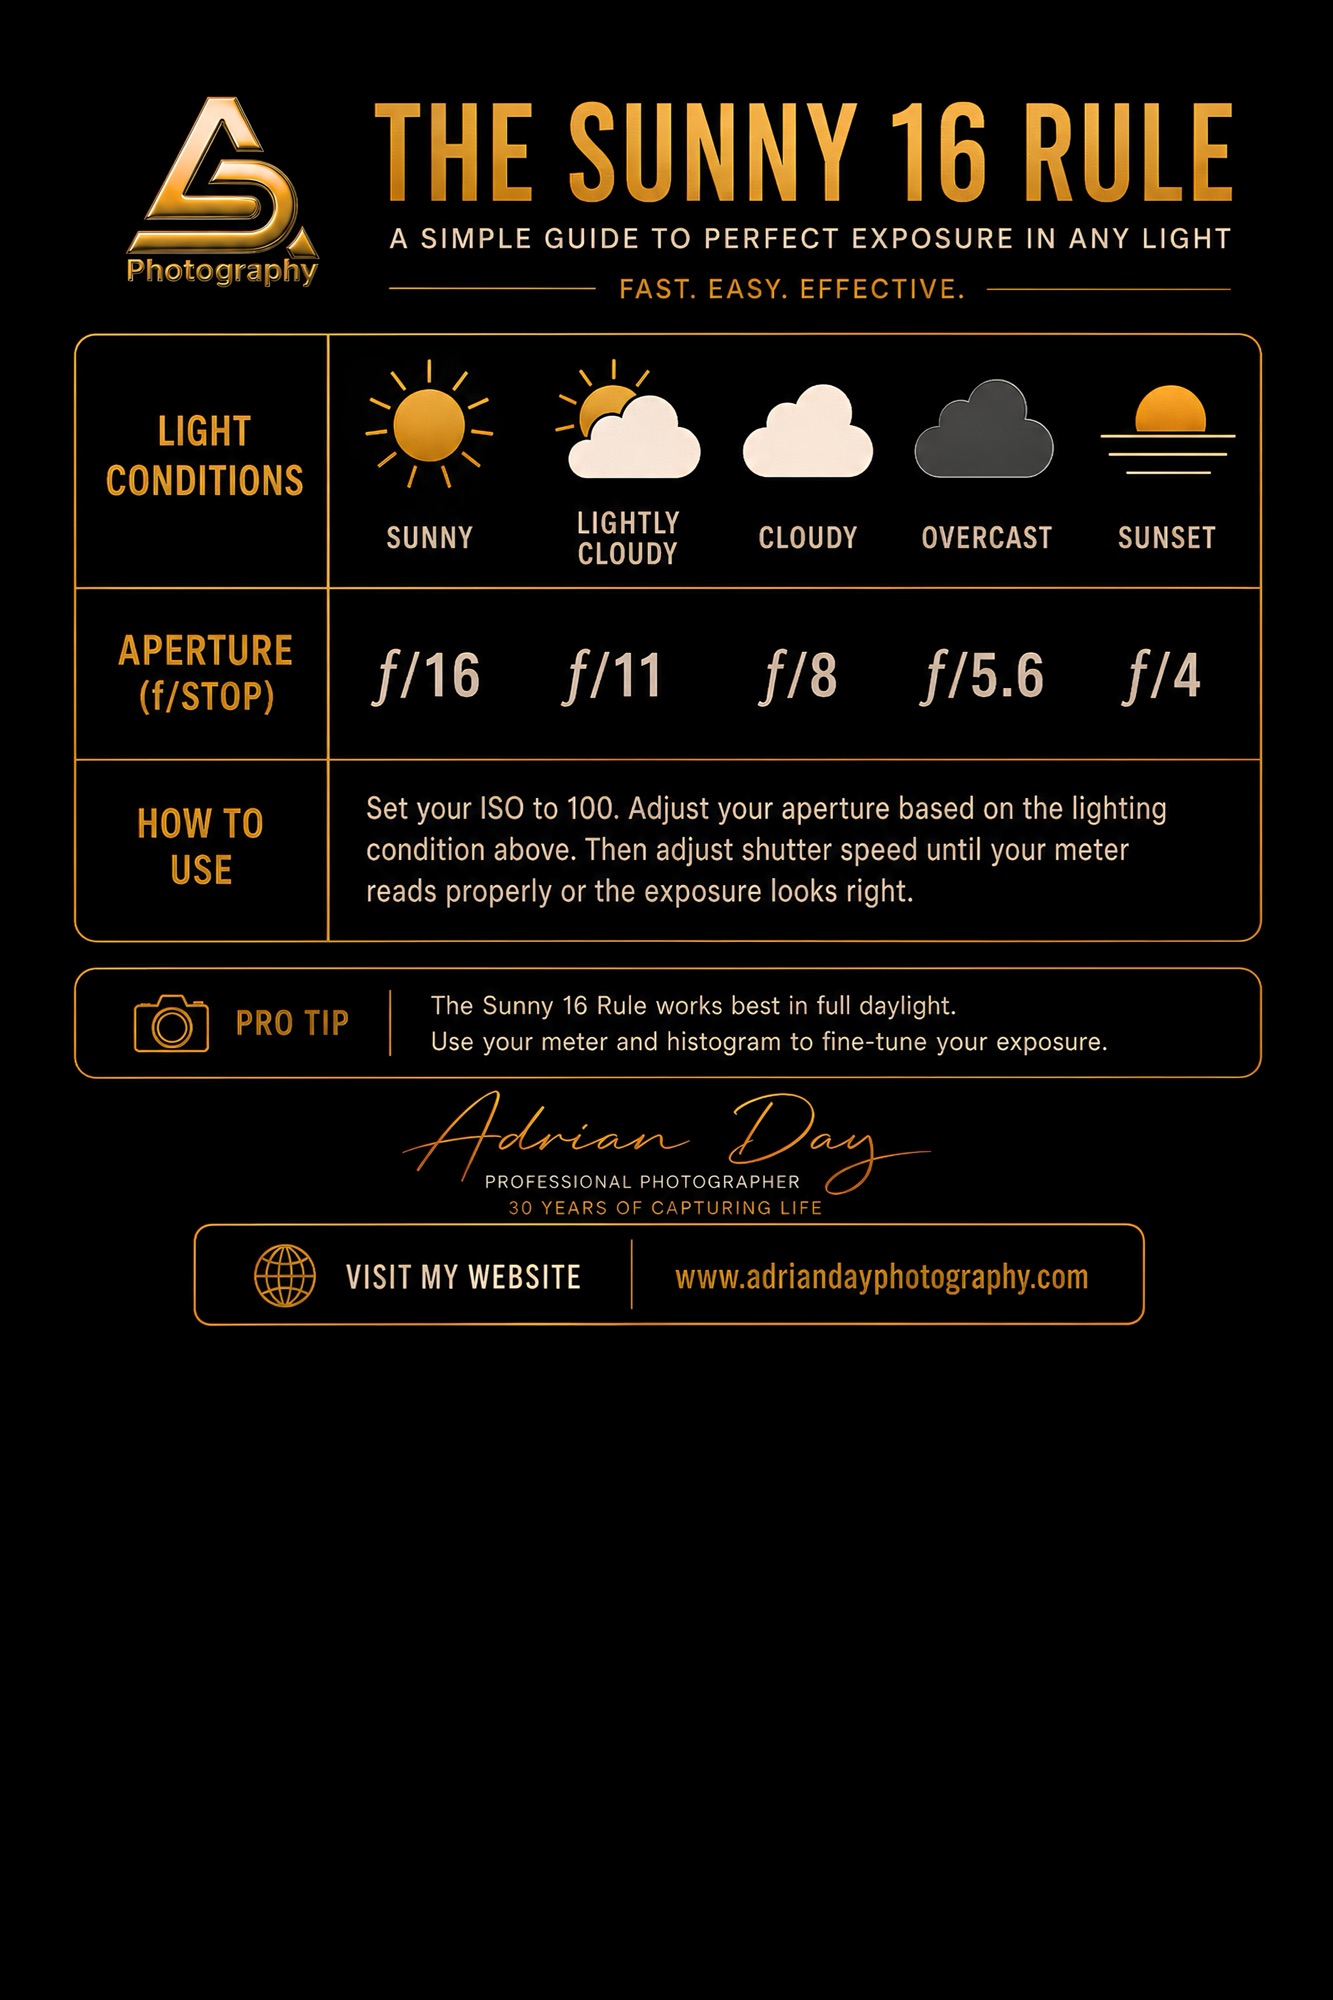
Tip 15 of 365 Sunny 16 rule with support sheet and video link on YouTube

The latest video is out sharing tips 15 of 365 tips and tricks for photographers.
Today’s tip is the sunny 16 rule and also comes with a batch of other apertures that are very useful ! So check out the video below and feel free to click the download button to download the free info sheet that you can keep and use when you’re next out with your camera!


Photography tips and tricks from a photographer with 25 years experience video on YouTube
On May 6th we started a new project.
The project is to share tips and tricks to help photographers learn ! These tips go from beginner to pro.
And the hope is to share at least one video every day for the next year!
If you click the link please follow our YouTube ! We would love to have you along for the journey!
And hopefully you and others will get to learn something along the way!
So click the link and let me know on YouTubej what you think! So far there’s thirteen videos posted ! So will be sharing so many more !

Win a JOBY Gorillapod Mobile Rig. Only three days left to get in the raffle.
So a month or so ago I created a small competition where I bought a joby gorillapod mobile rig to do a raffle..
We are coming into the last three days of the competition if this is something that you would like to be in with a chance of winning click the link below to purchase a ticket..
Competition is for United Kingdom residents only.. please only buy tickets if you reside in the United Kingdom.


With Summer bring’s life and colour to photography! But sometimes you have to look for something smaller
The last few weeks I’ve been limited to the distance I can go due to health, so creating landscape photography content has been a little challenging and sparse.
So i challenged myself to take something a little different, with a cheap lens that’s not made for the job in hand..
Don’t get me wrong, I have some beautiful locations to photograph on my doorstep but locally there’s a vast number of photographers taking photographs and sharing all very similar images.
Now this isn’t going to be macro at its finest. But the intention was to show, you don’t need the best macro lens or best camera body … to create some macro inspired content. And Head out into the wild and capture some wildlife, well, the small creatures that are out this time of year.
Now, this would have been made simple with a macro lens but sadly last year I broke my lens and due to other factors health wise and money wise I’ve not been able to replace it. So this is the perfect chance to do this challenge.
Also I set myself a few obstacles. Had to be in walking distance of my home, Lens and camera choice had to be light and able to fit in my hoodie pouch.. so I opted to take my Sony ZV-E10 camera body a 24 mp crop sensor camera and use a 16-50mm lens f3.5-5.6 PZ this made a perfect pocket sized mini kit. Not sure it will make for perfect critter capturing, but we’ll see.. keep reading 😉

So with the kit set I headed out for a short stroll to the local nature reserve. It’s about a five minute walk from my house so perfect local location.
It’s not a big place in fact the part I headed to you can walk around it in about ten minutes there’s a bigger part you can walk that would take about an hour round trip but as I say I just wanted to head out for a short stroll.
With the mixed weather we’ve been getting the last few weeks the vegetation and plant life doesn’t know if it’s coming, going, been or gone.. so I thought this could be a wasted journey but I was pleasantly surprised.
I walked through the metal gate to be greeted by long grass and lots of colourful, dare I say flowers.. vegetation and a lot of buzzing sounds. Could I be lucky and capture some bees about their business.
Well I took the camera out and just as I did a buff-tailed bumblebee buzzed past me and landed about five feet from me on a beautiful magenta plant – could I get an image in the bag this quick.. so I set the camera to 50mm (75mm as crop sensor) f9 1000/s and because of the f9 had to use a 1000 iso .. and took a chance I got down low and took the shot..
Looking at the back of the camera I was surprised, I had captured a very clean and pretty decent looking shot. Here’s that picture !

Don’t think it was too bad for the first shot of the day.. and as he took off right after I clicked the shutter leaving me with only a single shot . Some might say a fleeting moment captured…
Now to get up and look for more. When you enter the “nature reserve” you have about ten feet of entrance and then you’re greeted by a hedge with two openings kind of an in and out so to speak.
The hedge blocks your view of the rest of the small reserve. Annoyingly, the last time I was there the grass had been cut and there wasn’t much in the way of a meadow, but as I rounded the dividing shrubbery I was greeted with a meadow of greens, yellows and magenta blooms, a number of butterflies and because of the medium sized pond that’s engulfed in reeds and long grass there were a few breeds of dragonfly fleeting about. There were also a lot of honey bees and even more buff-tailed bumblebees .


If I’m honest this type of photography doesn’t come easy for me. I don’t have the steadiest of hands at the best of times hence why my settings are high when it comes to shutter speed. That and with the speed some of these critters move I thought it would be best to shoot fast.
Let’s get back to walking around the nature reserve. So, where was I?
Having been happy to see that there was life and a flowering meadows I started walking and looking for more opportunities which thankfully didn’t take too long before something caught my eye. Something I haven’t seen much of on my travels the last few years.
Numbers of butterflies locally have been pretty low.
This butterfly was eye catching in fact it wasn’t alone, this picture will definitely tell a thousand words and don’t think I need to say more about what they were getting up to.
I’m sure that you will agree these common blues have a beautiful pattern really something eye catching.


While I was praying to the camera gods ( down on my knees ) I noticed there was a honeybee just to the left of me. Only it was not staying in one place for long, so knew this could be like my first image a fleeting shot if I even manage to get it..
I had to change the settings because of the light kept changing. So these two although both different brightnesses were shot using 1/800s still at f9


There must be something about these magenta flowers if you know what these might be leave me a comment, I can’t seem to find what they are.
Next stop for me was waterside, I wanted to see if I could capture a picture of a dragonfly of some sort, and add to the days captures.
It took a little while of sitting by the water – probably about fifteen minutes or so when a small emerald damselfly (believe that’s what it’s called) started playing about over the water so maybe my luck was in.. but no such luck, it soon took off never to be seen again..
So there I sat for a while thinking this will be a bust not going to get one and then I see one ..literally two feet from me blending in behind a red twig .. a two inch long metallic emerald green dragonfly. It must have been there all along – now if I move am I going to make it fly away?
I twist moving the camera very slowly, I’m sure it sees me because it moves around the back of the twig (the little bugger is playing hide and seek) so the next shot, you will see what I mean – it’s like it’s watching me.

Now to play games with it, I want to get a better shot of it.. really isn’t easy because of its location and flowers in the way.. time to move a little round the side and get a side view.. this shot is what I managed to take by holding the camera out to one side and keeping my butt fully planted so not to make the grass or twigs move..
Zoom in and let me know what you think!

I’m pretty happy with it as it shows lots of detail and those colours are like multi coloured tinfoil. At least I managed to capture a picture of a dragon fly ..
I won’t hold you too much longer! On my walk away from taking the last few shots I managed to capture a few other beautiful butterfly images so will finish with a few of them.. there was so many on the other side of the tree (pictured previously )
What do you think of these.. these are a few I’m definitely proud of.. again beautiful detail and who knew that there would be so many types in one place.


And lastly

My conclusion even though having a macro lens and a full frame camera and so on will always take things to the next level.
I feel sometimes you don’t always need these things to still get creative and get up close and personal with a subject..
Even with some of the cameras from two or three years ago you can still get some cracking shots, let me know what you think,do you agree?
Do you like what I captured?
I’m no macro photographer and I’ve only done this sort of thing a handful of times.. but I’m sure you will agree theres something about each of these images that makes them stand out !
Until next time! Thanks for reading, now stop wasting time and go take some pictures 😉 😉 😉
On a December winters evening the rains came to town.
This time of year is always a little turbulent when it comes to the weather in the uk!
But this year it’s been or should I say the last couple of weeks it’s been crazy with very high winds heavy rain and wind chills that come, go and change by what feels like the minute.
So heading out with the camera isn’t always as simple as it sounds and with very expensive camera equipment it’s a do I or don’t I experience.
So with that in mind I left the camera gear on the table with the mind set and old school photography quote “the best camera is the one we have with us”
For me that means the iPhone 14 Pro Max. And it’s three camera lens options. And 12- 48mp sensor (depending on what’s lens is in use)
Now as I say the weather has been fun! And as I needed to pop to town I had a few images in mind.. the main one being, that I wanted to create something that could be used on a project I had in mind. every year i create a calendar and a Christmas card set that I sell. Of the local area Maldon.
And knowing that the Christmas lights had been switched on earlier this week was a perfect reason to capture a Christmas winter scene of the maldon town. I wanted to make sure that I got the maldon clock tower and the main road through the town and possibly a business or two with the best Christmas lights.
But then came the kicker! Before I even got a hundred yards from home the I could see the clouds setting in and the evening light was dwindling very quickly now I needed the light to go but was the clouds going to let me have time to take a few images before it let the rains come down on me!

Free digital download. Cinematic photography cheat sheet
Been working on a few projects over the holiday season! And also been given a little time to think about is there something that I can give my followers as a thank you for all their kind support.
So I come up with a few ideas one of which has gone live on my ko-fi page..
I have created a kind of cinematic landscape photography cheat sheet. It’s free or if you like to it give the option of leaving a donation of you choosing. But it is free if you want it for free. You just have to leave a few details and click download. Details are just so that I know people are downloading. You won’t be pestered by 101 emails from me.
The sheet is printable please don’t print to give away just send anyone you think would be interested this page link and tell them to download it.
It helps me know I’m helping others and also lets me know if I doing something right 😉
So without further ado! Here is the link!

Click this image to be taken to our ko-fi download page.

Thanks and happy new year from Adrian Day Photography
Firstly I want to thank you all for sticking with me on my journey. I want to thank everyone who has supported me with likes comments and shares on my posts.
I want to thank everyone who purchased our products from prints to calendars and Christmas cards. I couldn’t do this full time with out you all and the amazing support you give me. So thank you from the bottom of my heart.
We are going into 2025 and I hope that you will all continue to support like you did in 2024. And before the new year celebrations start I would like to take this opportunity to wish you all the very best for the year ahead may it bring to health and happiness with lots of love and joy.
Well it’s been a year! So much has happened in 2024! A lot of good and a number of bad things.
The end of 2023 I ended up in hospital and that got sorted out so we thought but sadly in February 2024 everything got worse and I ended up back in and things started to take a big turn for the worst.
I had sepsis and they found a number of nodules on my pancreas and also a big mass. As you know with anything this comes with a number of tests and if you’re in the UK A long wait for results. On talking with the consultant he told me that this could be that dreaded word cancer.
I’ve had many tests and hospital visits and to date I’m still not sure what the outcome is. All I know is I’m getting worse, in constant pain and have had to take a few steps back from the day to day photography that I love. Anyone one who is self employed will know this is a kick to the teeth at best of times but I’ve been trying to keep creating works and selling my products to pay for things needed to keep going. While the uncertainty continues and they start to help me. Even if it’s worst case. It’s going to be a fight. And something I hope to one day I come out the other side of but for now it’s day at a time, and on bad days bed rest.
If you would like to help support me at this time I have a ko-fi page set up for people to buy my image downloads. Or if you just want to tip me with the price of a coffee as support to me and my business that’s completely up to you and any one that does I will be eternally grateful.
On a brighter note I’ve managed on my good days to get out and get some print worthy images. In the last year I’ve seen over 20 of my images in the local news papers ! Seen it posted in publications and show stands too. Also had many people asking to purchase prints. And this will never get old but with each I’m always so grateful. I get such a feeling it’s hard to explain but it’s sheer gratitude!
Here are a couple of image that made the local news papers (what I can find)


There are more but the images are on my back up drive and not to hand on my phone where I’m currently writing this post 😉
So the other good things was the sale of my calendars I made a limited edition and a very limited run number and all but two have sold. So if you would like one please let me know first come first served just send me an email to adrianday@photographer.net

So I won’t hold you up too much longer but I do want to say once again a big thank you to everyone who has continued to support me and my full time photography journey. I love each and everyone of you and I hope that you will continue supporting
Happy New Year all the best for 2025
Make it a safe one

As photographers, Are we hung up on gear and the best of the best sharpness!
Having been a photographer for over 20+ years I’ve had the pleasure to use a mix of lenses, bodies, brands.
I’ve seen people pixel peeping and making sure that their images are so sharp, that you could almost cut yourself!
Brands are bringing out bigger, brighter, and better bodies almost monthly in a bid to be ‘brand of the year’ and with those brands comes megapixel perfection! 24mp, 40mp and some even 100mp plus.
Lenses have become increasingly clearer, with better and better glass including Zeiss, Sony G master, Sigma Art, Canon Rf, there are so many it’s hard to name them all and to keep up!
With that, comes the cost! The price of quality comes at a premium. And sometimes that’s where those starting out differ from those who are well established and possibly have a bank balance to burn.
Media shows us that the best images/video make the cut! To stand out you need to have 4/8k video or 100mp images with perfect colours, the right depth of field and beautiful bokeh!
But do we need this ! The tools help us create higher quality content but depending on what you’re doing with the output image it’s not the best all and end all!
I’m not done here but, Whats your opinion? Leave a comment
The last few weeks I’ve been sharing images to a number of media outlets! Including and not limited to printed products, social platforms, websites and even local news papers.
All of which have been images taken using all different brands/quality of body and or lens variations. I’ve had amazing feedback on the images with people sharing them, comments left, right and centre, and over the last 4 months seen images picked for publication without any question of … what camera brand, lens, pixel amount those images were taken with.
This has lead me to question whether we need the best of the best and do we need to buy the latest version of our chosen brands, because something new has been added to the latest version.
So last week I set myself a challenge! Get published with low quality gear!
Now I shoot with two brands Sony and Nikon, I have two cameras of each brand! Not going to be specific with models. Or details. But I set myself some basic rules that the lens choice had to stick to;
- Priced under £100.
- Had to be second hand.
- Needed to be multi use. (Landscape / macro / zoom etc)
- Had to fit kit I owned.
- Didn’t need to be brand specific. (Like Nikon for Nikon or Sony for Sony)
So I popped to the local camera shops with the mind set of getting a telephoto lens, that possibly has macro brand of Sigma or Tamron.
It didn’t take long to find the candidate! the Tamron 70-300 macro lens,

For starters, it seems like it has a lot going for it. It’s both telephoto and macro and looking in the window of the local Camera World. It’s under £100 by £5 and walking past Cex I see it for even less £85 well it’s looking more and more appealing. But times run away and blooming shop was shut! So guess it’s not meant to be!
But now I have an idea of what I’m looking for– Time to head home!
With the shops shut what will any tech guy do ! Yes head to the big World Wide Web! And the trusty MPB. For those that don’t know about MPB. They are a fantastic online company buying and selling all things photography. I’ve used them many times for lenses and bodies, so it will always be my next stop if local shops don’t have what I’m wanting.
If you want to save money, stick around for a link to saving £20 on any new purchase. At MPB.com
Back to searching! So a few clicks later and it’s on screen, there was three available for sale second hand and it didn’t come as a shock but the price was OVER half the cost of camera world and CEX

I didn’t waste time! Clicked the buy button and sorted out the details and just two days later there it was on the door step! Now ! You can see that this one is classed as GOOD condition.. and for the sum of £41 can’t really ask for much more ! Personally I think the rating was a little low! Opening the box of this very well wrapped up product soon showed me it was great condition! And like always ! I couldn’t wait to try it ! So with my trusted model I snapped the first shots …

Model Marlie ! Low window light ..
Setting F7.1 – 1/1600s – iso 400 @ 202mm
Okay first off this lens isn’t fantastic ! But again what more could you ask for from a lens that’s not brand new, that’s been out years, possibly been used a lot. Though the look of the lens seems like it’s been in a bag and not used for a while.. but on testing showed its self to be pretty sharp, focused after a couple of clicks and focus motor wasn’t too loud either !
TOUCH WOOD ! ALL GOOD! So far
Now to get some pictures and see if I can get published 🙂
The next day came and I thought I would head to town to get some local shop / location pictures
These are the pictures I captured.
Again these images are not perfect, but pretty clear and the best I could get at 70mm. Now to post them to the pages that could potentially take my images and make publications out of 1 or more!


A week later looks what happened! Here is one of the images in the local news paper.

It’s not perfect but it’s still a publication.. and I still haven’t really used the lens to its full potential. Yet..
This shows that any quality of lens and camera body has the potential. You don’t need the all singing all dancing gear ..
Don’t get me wrong having the best gear will make things a little easier or even have a better quality overall but this shows it’s not all about spending £1000’s on gear … you can do it on a budget if need be …
Maybe it’s all in the eye of the photographer and his editing skills 😉
Watch this space for more on this lens and using low quality lenses to get published and paid work !
Get £20 off for your first purchase at MPB. By clicking the link below! This is a promotion and I believe a limited time offer! If asked use code Adrian Day at checkout.
